Here is a quick video showing all this in action.
Cube Location
The robot uses a webcam to take a picture of each side, we'll focus on this photo of a 4x4x4 cube. I use python opencv2 for all of the image processing.

Canny Edge Detection
The first steps are to load the image, gray it, blur it a little and then use Canny edge detection to locate all of the edges.
self.image = cv2.imread(filename)
gray = cv2.cvtColor(self.image, cv2.COLOR_BGR2GRAY)
blurred = cv2.GaussianBlur(gray, (3, 3), 0)
canny = cv2.Canny(blurred, 20, 40)
 |
| Canny Edges |
Dilate
The next step is to dilate the lines a little, this makes the lines thicker which will make it easier to find the contours of the squares.kernel = np.ones((3,3), np.uint8)
dilated = cv2.dilate(canny, kernel, iterations=2)
 |
| Dilated Canny Edges |
Contours
At this point we have a black and white image with nice thick lines around each square. opencv has the ability to find all of the contours in an image where a contour is defined as "a curve joining all the continuous points (along the boundary), having same color or intensity".(contours, hierarchy) = cv2.findContours(dilated.copy(),
cv2.RETR_TREE,
cv2.CHAIN_APPROX_SIMPLE)
 |
| Contours |
Contour Approximations
It looks like someone spilled a plate of blue spaghetti noodles all over the cube doesn't it? We need to reduce the complexity of the shapes of the contours. We can do this via opencv's approxPolyDP which in a nutshell approximates the shape of a contour. In the image below the contours are again in blue but their approximations are in red. |
| Contours (blue) with approximations (red) |
Square Contour Approximations
The approximations look much easier to work with in terms of figuring out which ones are squares. We look at each approximation and use the following three rules to determine if it is a square:
- There must be four corners
- All four lines must be roughly the same length
- All four corners must be roughly 90 degrees
In the image below the contour is green instead of blue if the approximation for that contour satisfies our rules for being a square.
 |
| Contours with square approximations are green |
At this point we can eliminate all of the contours that are not squares, that cleans things up a lot
 |
| Removed non-squarish contours |
Squares within squares
Things are looking better but we have three squares in the middle where there is a square around the square. This happens from finding the contours of the black sections between each square. We eliminate these outside squares which leaves us with:
 |
| Removed squares around squares |
Cube dimensions and boundries
We can now analyze the remaining contours and figure out two key pieces of information
- We are dealing with a 4x4x4 cube
- We can find the boundries of the cube
 |
| Removed contours outside cube boundry |
Handling Errors
Sometimes the squares of a cube are dented or the sticker is peeling off or there is some really bad glare or it is in the shadows or there is some other crazy problem that makes the contour approximation fail one of our three "is it a square" rules when in fact it is a square. This happened in the image below, the square that is in the 3rd row, 5th column has a contour approximation that doesn't look like a square (the contour is blue, the approximation is red). Here we see the approximation is a triangle so it clearly failed the "There must be four corners" check. |
| Non-square approximation for a square |
 |
| Missing One Square |
 |
| All Squares Located |
Color Extraction
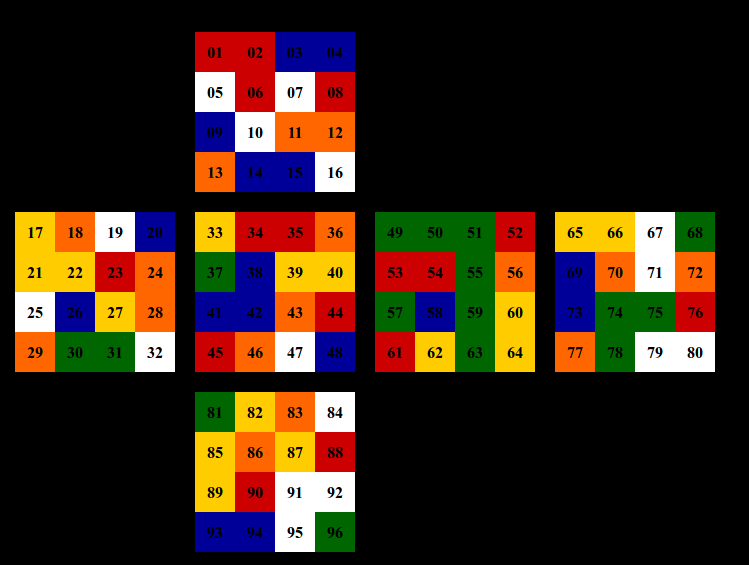
Once we've processed the images for all six sides we have the RGB (Red, Green Blue) value for each square. The 4x4x4 image from our example is side F in the cube below, the colors shown are the mean RGB values as extracted from the images. Notice how much variation there is...40 is a good bit darker than 17 but these are both yellow squares.
 |
| Raw RGB values |
The next step is to take those RGB values and identify which side (U, L, F, R, B, or D) the square belongs to. We do this because all rubiks cube solvers need to know the exact state of the cube.
The actual mechanics of how this works isn't terribly exciting to write about in a blog but in a nutshell it does the following:
- Identify the six colors used by the cube. In this case the colors are red, orange, green, blue, yellow and white.
- Create a list of the color combinations used by all edges (red/blue, yellow/red, etc)
- Create a list of the color combinations used by all corners (white/orange/green, red/blue/white, etc)
- Create a list of centers color squares
- For each edge (say U5 L18 for example) compute the color distance of that edge vs. all of the edges that in the "list of edge color combinations that we need" and find the one that is the closest match. The distance between two colors is calculated using the CIEDE2000 algorithm. For the U5 L18 example the needed color combination that matches with the lowest color distance is white/orange so we assigne white/orange to U5 L18 and remove white/orange from the needed list (since this is a 4x4x4 there is one more white/orange left on the needed list).
- Repeat the process for the corners and centers
And finally we print out a big string that represents the state of the cube. This string is what is passed to various rubiks cube solvers so they can compute a solution. For the cube above the state string is
RRBBURURBULLLBBUFFFRRRFLFBFDRDFDDRRLFBDDBBLRRLUBFDLUDLDRDRUUBBUFDLUBDDRLUBDLLFFUDDUFBLULBFFRLFUU
The color resolver code is available at https://github.com/dwalton76/rubiks-color-resolver
The Code
If you have a linux box, webcam and a Rubiks cube you can install the software that I used in the video. It is available at https://github.com/dwalton76/rubiks-cube-tracker...just follow the install instructions in the README.
References
- http://www.pyimagesearch.com/2015/04/06/zero-parameter-automatic-canny-edge-detection-with-python-and-opencv/
- http://www.pyimagesearch.com/2016/02/08/opencv-shape-detection/
- http://docs.opencv.org/trunk/d9/d8b/tutorial_py_contours_hierarchy.html
- http://www.alanzucconi.com/2015/09/30/colour-sorting/
- https://en.wikipedia.org/wiki/Color_difference
Thank you very much for this, it is extremely informative and helpful to people like me who are new to using OpenCV. I know what I want to do but wasn't quite sure what opencv functions to use. Thank you so much!
ReplyDeleteYou are very welcome:) Post here when you finish your project I would love to see what you are working on.
DeleteOlá gostaria de sua ajuda não consigo abrir o programa
ReplyDeleteCan u send me original code i cont able to find plss gontuvidhyasagareddy@gmail.com
ReplyDeleteThe code is here:
Deletehttps://github.com/dwalton76/rubiks-cube-tracker
This comment has been removed by the author.
ReplyDeletehey man ,
ReplyDeletereally cool project , I tried it out but it wouldnt recognise the the whole 3x3 cube faces , because the webcam launches in a lower resolution , could you help me out in changing the resolution that the webcam launches at!
thanks
Hi: my name is Chui (email: schui@ymail.com) and I live in Hong Kong. I have to say your project rocks!
ReplyDeleteI installed all your python scripts etc and try to solve a 3x3x3 as initial start, but run into the following error: can you help ?
root@lubuntu01:~/rubiks-cube-NxNxN-solver# cd ~/rubiks-cube-NxNxN-solver/; ./usr/bin/rubiks-cube-solver.py --colormap '{"B": "Ye", "D": "Gr", "F": "Wh", "L": "OR", "R": "Rd", "U": "Bu"}' --state UUFUUFUUFRRRRRRRRRFFDFFDFFDDDBDDBDDBLLLLLLLLLUBBUBBUBB
2019-01-16 12:28:05,080 rubiks-cube-solver.py INFO: rubiks-cube-solver.py begin
2019-01-16 12:28:05,258 rubiks-cube-solver.py INFO: CPU mode fast
2019-01-16 12:28:05,259 __init__.py INFO: U U F
2019-01-16 12:28:05,259 __init__.py INFO: U U F
2019-01-16 12:28:05,260 __init__.py INFO: U U F
2019-01-16 12:28:05,260 __init__.py INFO:
2019-01-16 12:28:05,261 __init__.py INFO: L L L F F D R R R U B B
2019-01-16 12:28:05,261 __init__.py INFO: L L L F F D R R R U B B
2019-01-16 12:28:05,262 __init__.py INFO: L L L F F D R R R U B B
2019-01-16 12:28:05,262 __init__.py INFO:
2019-01-16 12:28:05,263 __init__.py INFO: D D B
2019-01-16 12:28:05,263 __init__.py INFO: D D B
2019-01-16 12:28:05,264 __init__.py INFO: D D B
2019-01-16 12:28:05,264 __init__.py INFO:
2019-01-16 12:28:05,265 __init__.py INFO:
Traceback (most recent call last):
File "./usr/bin/rubiks-cube-solver.py", line 178, in
cube.solve(solution333)
TypeError: solve() takes 1 positional argument but 2 were given
root@lubuntu01:~/rubiks-cube-NxNxN-solver#
I think I may have figured this out:
ReplyDeleteunder rubikscubernnnsolver
__init__.py(): line 4192: instead of "def solve(self)", change it to "def solve(self, solution333=none)" AND
RubiksCube333.py: line 110, same solution as above.
How do I integrate the codes together? Python 2 and 3.
ReplyDelete